DIY
How to create a new case for your iPhone
By: Sara Cifuentes 10B
Since IPhones are the most popular cellphones of the moment and we all want to take care of them, the moment of looking for the appropriate phone case, most of the times, turns to a disaster.
In this DIY I will teach you how to create your own phone case, with your favorite color, using an excellent material, in addition to being easy to construct, and having a very low price.
First, you need to buy a rubber band. They are easy to find, but for sure you can find one in a convenience store. Make sure you buy a band of good material in order to ensure your case will be able to resist slaps, and also to take the rectangular form of the cell phone. Don’t forget to choose the rubber band of your favorite color!
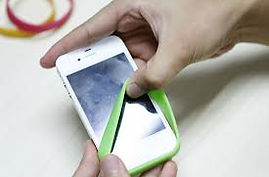
Second, after you place the band around the cell phone, you have to draw over the band, with a pen, where the volume bottoms are, where you charge it and insert you headphones.
Third, using a pair of scissors cut what you did in the second step in order allow a proper use of your IPhone.
Now you have your phone case ready to cover your cell phone!
Remember that there are many ways to make the things we use daily on our own, having fun, learning new things, and saving money.
Cake Pops
By: Maria Luisa Limas 10A
The school year is almost over and stress can get the best of us, why don’t you try to relax and maybe have a good time with your friends while you cook a delicious dessert?
CAKE POPS: (20 Cakepops)
Ingredients:
-
Simple cake ingredients or a Ramo cake (1 eight piece package).
-
2-3Eggs
-
¼ cup Vinegar
-
1 lb. Sugar
-
1 package of chocolate to melt, white or black
-
Plastic sticks
-
Sprinkles
Procedure:
-
Bake a simple cake; or in case you have already bought one, place it in a bowl and crumble it until it is all in fine parts.
-
Make some simple frosting with the eggs, sugar and vinegar.
-
Place the eggs on the mixer at a medium speed and wait for the egg white to take a texture that resembles snow.
-
Keep mixing while adding the vinegar.
-
Start adding sugar in small proportions while mixing, and wait until the frosting gets to a perfect texture (moldable).
-
Mix the frosting with the cake crumbles until you are able to make small spheres that maintain their shape, and following this step make as much as you want with the size you like the best. Insert the plastic sticks to the top of the ball.
-
Take them to the fridge for 15-20 minutes.
-
While waiting, you may start melting small parts of chocolate in the microwave or in a bowl with boiling water. Once it is in liquid state, take the cake pops from the fridge and use the sticks to immerse them in the chocolate; you may use the help of a spatula.
-
Add some sprinkles before the chocolate gets rigid, and enjoy!
GETTING ECOLOGICAL
By: María Camila Sáenz 10b
This idea will not only make you want to do this, but will also make you think about how creative and fun ecology can be. Have you ever thought about planting upside down? WELL! I will show you an amazing way to do it.
First let’s check what you’ll need
-
2-liter bottle or juice carton
-
Garbage bag
-
Duct tape
-
Tomato plant
-
Utility knife
-
Paper towel
-
Cotton balls
-
Twine
NOW LET`S GET STARTED
1. Using the knife carefully cut off the bottom
of your bottle or carton.
2. Roll up a garbage bag around your arm and
insert into the bottle. Once inside, loosen the bag
and try to spread it evenly within the bottle. The
reason I used the black bag was to keep the roots
covered and hopefully warm in the sun.
3. Fold the top edge of the bag over the
bottle and secure with duct tape.
4. Wrap a tomato plant with paper towel and
carefully insert into the bottle and out through the
spout. The towel will help keep the soil together.
5. Fill the rest of the bottle with soil.
6. Wrap some twine or string at the mouth of
the bottle, stretching along the length of
the body, and tape in place.
7. Stuff some cotton balls through the bottom
opening to help keep water in.
8. Hang in a sunny spot and water thoroughly.
Our plants have been growing strong for at least
three weeks now and appear to be doing well. Within
the first week, the plant flipped around and started
growing upwards.